Terms of Service
These Terms of Service (the "Agreement") set forth the terms and conditions that apply to your access and use of the internet website owned and operated by MonsterInsights, LLC ("UserFeedback") and located at userfeedback.com and *.userfeedback.com (the "Site") including all subsidiary webpages and access to any optimized version of the Site via a wireless device, and access and use of the services available thereon, including, without limitation, the services that enable you to create, test and host promotion-specific custom landing pages for online marketing purposes (the "Services"). This Agreement is legally binding between you, the person using this Site, and UserFeedback. Terms such as “we,” “our” and “us” refer to UserFeedback.
YOU ACCEPT AND AGREE TO THIS AGREEMENT AND CONSENT TO USERFEEDBACK’S PRIVACY POLICY LOCATED AT https://www.userfeedback.com/privacy-policy/ (THE "PRIVACY POLICY"), BY DOING ANY ONE OF THE FOLLOWING ITEMS: (1) VISITING THIS SITE; (2) MAKING A PURCHASE OR SUBMITTING CONTENT THROUGH THE SITE; (3) COMPLETING THE ONLINE APPLICATION PROCESS BY CLICKING A BOX INDICATING YOUR ACCEPTANCE; OR (4) BY EXECUTING A SUBSCRIPTION THAT REFERENCES THIS AGREEMENT; (5) BY USING USERFEEDBACK OAUTH SIGNUP FLOW INSIDE THE WORDPRESS PLUGIN. If you are entering into this Agreement on behalf of a company or other legal entity, you represent that you have the authority to bind such entity to these terms and conditions, in which case the terms "you" or "your" shall refer to such entity. If you do not have such authority, or if you do not agree with these terms and conditions, you must not accept this Agreement and may not use the services.
On our Site, we may provide short summaries of the terms and conditions in this Agreement. Any such summaries are provided only for your convenience, are not legally binding and do not modify this Agreement in any way.
UserFeedback may update or modify this Agreement or the Privacy Policy at any time and such updated versions will be posted on the Site. You are responsible for periodically checking the Agreement and Privacy Policy. Your continued use of the Site and/or the Services after this Agreement and/or Privacy Policy are updated shall be deemed acceptance of any such updated Agreement and/or Privacy Policy.
Ability to Enter into this Agreement
Your Profile Information and Account
Fees
Intellectual Property Rights
Confidential Information
Plugin License
Disclaimer of Warranties
Web Content Accessibility Guidelines Compliance Disclaimer (“WCAG Disclaimer”)
Support
License Holders
Inactive License
Limitation of Liability / Exclusion of Consequential and Related Damages
Indemnity
Automatic Renewal
Cancellation and Termination
Refund Policy
Discount Policy
Agreement to Governing Law and Jurisdiction
Severability
Legal Remedies
Surviving Provisions
Manner of Giving Notice
Miscellaneous
Ability to Enter into this Agreement
This Site and the Services are not designed for or directed at children 13 years of age or younger. In addition, in order to enter into this Agreement, you must be 18 years old or have otherwise reached the legal age of majority in your jurisdiction of residence or possess legal parental or guardian consent, and are fully able and competent to enter into the terms, conditions, obligations, affirmations, representations and warranties set forth in this Agreement, and to abide by and comply with this Agreement. It is your responsibility to ensure that you are legally eligible to enter into this Agreement under any laws applicable to you in your jurisdiction of residence or otherwise. If you accept this Agreement, you represent that you have the capacity to be bound by it.
You may not use the Services and may not accept this Agreement if (a) you are not of legal age to form a binding contract with UserFeedback, or (b) you are a person barred from receiving the Services under the laws of the United States or other countries including the country in which you are a resident or from which you use the Services.
Before you continue, you should print or save a local copy of this Agreement for your records.
Your Profile Information and Account
In order to access certain Services, you may be required to provide information about yourself (such as API, identification or contact details) as part of the registration process for the Service or as part of your continued use of the Services. You may also have to create passwords or other forms of authentication. You agree to provide true, accurate, current and complete information about yourself, and you may not misrepresent your profile information. You agree and understand that you are responsible for maintaining the confidentiality of any such information or passwords. Accordingly, you agree that you will be solely responsible to UserFeedback for all activities that occur under your account. If you become aware of any unauthorized use of your password or of your account, you agree to notify UserFeedback immediately.
Your right to access and use the Services is personal to you and is not transferable by you to any other person or entity. You agree not to disclose your password to any third party. You are solely responsible for all activities that occur under your Account or under your Profile Information. If you become aware of any unauthorized use of your Account or Profile Information, you are responsible for notifying UserFeedback immediately.
By providing us with your e-mail address, you agree to receive all required notices electronically to that e-mail address. It is your responsibility to update or change that e-mail address, as appropriate.
By providing us with your phone number, you agree to allow UserFeedback to contact you via that telephone number regarding all billing notices and/or inquiries (including, but not limited to: payment issues, billing discrepancies, declined/failed payments and/or expired payment methods). It is your responsibility to update or change that phone number, as appropriate.
Fees
You shall pay all fees specified in any subscription to Services or use of the Site (“Subscription”). We will charge you a periodic fee based on the Subscription you choose. Such fees shall be billed in advance for each period and are non-refundable except as specifically mentioned in these Terms of Service. Except for refunds provided for cancellation of Subscriptions within the first fourteen (14) days (as described in the section below entitled Cancellation and Termination and in the UserFeedback Refund Policy), there will be no refunds or credits for partial months of service or for periods in which your Subscription remains active but you do not use the Services
We reserve the right to modify our billing rates at any time upon thirty (30) days written notice by posting such fee changes to the Services or on the Site.
At our discretion, we may offer free or discounted pricing for use of the Services (a “Trial Program”). Once the terms of any Trial Program have expired, you agree that our normal billing rates shall apply. You agree to comply with any additional terms, restrictions or limitations (including limitations on the total amount of usage) we impose in connection with any Trial Program. You may not sign-up for multiple Accounts in order to receive additional benefits under any Trial Programs.
You agree to pay all charges incurred by users of your credit card, debit card, or other payment method used in connection with your Subscription at the prices in effect when such charges are incurred. You will pay any applicable taxes, if any, relating to any such purchases, transactions or other monetary transaction interactions.
All prices listed, fees, charges and refunds are issued in USD. We make no guarantees as to the exchange rate between any currencies, or that the exchange rate will remain unchanged during any period of time. The cost of Services may increase or decrease over a given period of time depending on the currency you choose to pay with and the specific exchange rate at that time. Refunds are likewise issued in USD and are subject to exchange rate volatility. There will be no additional refunds or credits issued in consideration of current or eventual exchange rates. You are responsible for any currency exchange taxes, fees, or other costs that may incur by making a purchase of our Services.
Intellectual Property Rights
All right, title, interest and ownership and intellectual property rights in and to the Site, UserFeedback trademarks and the templates provided via the Site, including but not limited to its "look and feel" (e.g., text, graphics, images, logos, buttons, icons and the placement and layout thereof), images, video, audio, data, content, software (including html-based computer programs) and other media, material or information, other than your Content, are and will remain the property of UserFeedback or its software or content suppliers. Any templates or derivatives of templates provided that you may build using the Site belong to UserFeedback. The Site is protected under Canada, United States and international copyright, trademark and other laws and treaties.
Subject to the terms and conditions of this Agreement, UserFeedback grants to you, during the term of this Agreement, a non-transferable, non-sublicensable, non-exclusive, revocable, limited-purpose right to access and use the Services that are subject to a valid Subscription.
You acknowledge that any ideas, suggestions, concepts, processes or techniques which you provide to UserFeedback related to the Services, the Site or UserFeedback or its business ("Feedback") shall become UserFeedback's property without any compensation or other consideration payable to you by UserFeedback, and you do so of your own free will and volition. UserFeedback may or may not, in its sole discretion, use or incorporate the Feedback in whatever form or derivative UserFeedback may decide into the Site, its software, services, documentation, business or other products, or any future versions or derivatives of the foregoing. You hereby assign all rights on a worldwide basis in perpetuity to UserFeedback in any Feedback and, as applicable, waive any moral rights.
UserFeedback owns any test results, data information and other output generated by your use of the Site and/or the Services during the term of this Agreement.
The following are registered trademarks, trademarks or service marks of MonsterInsights, LLC or its Affiliates: UserFeedback™. All custom graphics, icons, logos and service names are registered trademarks, trademarks or service marks of MonsterInsights, LLC or its Affiliates. All other trademarks or service marks are property of their respective owners. Nothing in these Terms of Use grants you any right to use any trademark, service mark, logo, and/or the name of MonsterInsights, LLC or its Affiliates.
Confidential Information
You agree to safeguard, keep secret and not to disclose to any third party, any Confidential Information acquired, learned or provided from UserFeedback during the term of this Agreement or following the expiration or termination of this Agreement. "Confidential Information" means any information marked confidential or that ought reasonably to be considered confidential under the circumstances and includes, without limitation, any business plans, customer lists, operation procedures, trade secrets, design formulas and programming code, know-how and processes, computer programs and inventions, discoveries, and improvements of any kinds.
Plugin License
UserFeedback WordPress plugin is licensed under the GNU general public license (http://www.gnu.org/licenses/gpl.html) version 2.0 or later.
Disclaimer of Warranties
YOUR USE OF THE SITE AND ALL CONTENT FORMING PART OF OR RELATED TO THE SITE, INCLUDING ANY CONTENT YOU UPLOAD OR SUBMIT AND ANY THIRD PARTY SOFTWARE AND CONTENT, ARE AT YOUR SOLE RESPONSIBILITY AND RISK. THE SITE IS PROVIDED ON AN "AS IS" AND "AS AVAILABLE" BASIS. USERFEEDBACK EXPRESSLY DISCLAIMS ALL REPRESENTATIONS, WARRANTIES, OR CONDITIONS OF ANY KIND WITH RESPECT TO THE SITE, WHETHER EXPRESS OR IMPLIED, INCLUDING, BUT NOT LIMITED TO, THE IMPLIED WARRANTIES OR CONDITIONS OF MERCHANTABILITY, FITNESS FOR A PARTICULAR PURPOSE, ACCURACY, COMPLETENESS, PERFORMANCE, SYSTEM INTEGRATION, QUIET ENJOYMENT, TITLE, AND NON-INFRINGEMENT.
USERFEEDBACK DISCLAIMS ANY WARRANTY THAT THE SITE OR ANY CONTENT, INCLUDING WITHOUT LIMITATION ANY THIRD PARTY SOFTWARE AND CONTENT, WILL MEET YOUR REQUIREMENTS OR BE UNINTERRUPTED, TIMELY, SECURE, OR ERROR-FREE, THAT DEFECTS WILL BE CORRECTED, OR THAT THE SITE OR THE SERVERS THAT MAKES THE SITE AVAILABLE ARE FREE OF VIRUSES OR OTHER HARMFUL COMPONENTS. YOU AGREE THAT, FROM TIME TO TIME, USERFEEDBACK MAY REMOVE THE SITE FOR INDEFINITE PERIODS OF TIME WITHOUT NOTICE TO YOU. YOUR ACCESS AND USE OF THE SITE MAY BE INTERRUPTED FROM TIME TO TIME FOR ANY OF SEVERAL REASONS, INCLUDING, WITHOUT LIMITATION, THE MALFUNCTION OF EQUIPMENT, PERIODIC UPDATING, MAINTENANCE OR REPAIR OF THE SITE OR OTHER ACTIONS THAT USERFEEDBACK, IN ITS SOLE DISCRETION, MAY ELECT TO TAKE. USERFEEDBACK MAKES NO GUARANTEE REGARDING: (A) THE SECURITY OF ANY INFORMATION PROVIDED BY YOU INCLUDING BUT NOT LIMITED TO YOUR API; OR (B) THE COMPATIBILITY OF YOUR SOFTWARE, HARDWARE OR CONTENT WITH THE SITE.
USERFEEDBACK IS NOT RESPONSIBLE FOR THE ACTS OR OMISSIONS OF, OR FOR THE FAILINGS OF, ANY THIRD-PARTY PROVIDER OF ANY CONTENT, SERVICE, NETWORK, SOFTWARE OR HARDWARE, INCLUDING BUT NOT LIMITED TO, INTERNET SERVICE PROVIDERS, HOSTING SERVICES UTILIZED BY USERFEEDBACK, TELECOMMUNICATIONS PROVIDERS, CONTENT PROVIDED BY OTHER USERS, OR ANY SOFTWARE OR HARDWARE NOT PROVIDED BY USERFEEDBACK.
YOU ARE SOLELY RESPONSIBLE FOR ENSURING THAT YOUR CONTENT IS COMPATIBLE WITH THE SITE. USERFEEDBACK DISCLAIMS ANY LIABILITY OR RESPONSIBILITY FOR ANY UNAUTHORIZED USE OF YOUR CONTENT BY THIRD PARTIES OR OTHER USERS OF THE SITE AND IS NOT RESPONSIBLE FOR PROTECTING YOUR CONTENT.
ANY MATERIAL DOWNLOADED OR OTHERWISE OBTAINED THROUGH THE USE OF THE SITE IS DONE AT YOUR OWN DISCRETION AND RISK AND YOU WILL BE SOLELY RESPONSIBLE FOR ANY DAMAGE TO YOUR COMPUTER SYSTEM OR OTHER DEVICE OR LOSS OF DATA THAT RESULTS FROM THE DOWNLOAD OF ANY SUCH MATERIAL.
NO ADVICE OR INFORMATION, WHETHER ORAL OR WRITTEN, OBTAINED BY YOU FROM USERFEEDBACK OR THROUGH OR FROM THE SITE SHALL CREATE ANY WARRANTY NOT EXPRESSLY STATED IN THIS AGREEMENT.
THE SITE IS OFFERED AND CONTROLLED BY USERFEEDBACK FROM ITS FACILITIES IN THE UNITED STATES. USERFEEDBACK MAKES NO REPRESENTATIONS THAT THE SITE IS APPROPRIATE OR AVAILABLE FOR USE IN OTHER LOCATIONS. THOSE WHO ACCESS OR USE THE SITE FROM OTHER JURISDICTIONS DO SO AT THEIR OWN VOLITION AND ARE RESPONSIBLE FOR COMPLIANCE WITH LOCAL LAW.
Web Content Accessibility Guidelines Compliance Disclaimer ("WCAG Disclaimer")
YOU ACKNOWLEDGE AND AGREE THAT USERFEEDBACK DO NOT WARRANTY, ASSURE AND/OR GUARANTEE THAT ITS SOFTWARE IS OR SHALL EVER BE COMPLIANT WITH THE WEB CONTENT ACCESSIBILITY GUIDELINES PURSUANT TO WCAG 2.0, WCAG 2.1, AND/OR ANY SUCCESSOR LAWS OR GUIDELINES (COLLECTIVELY, “WCAG COMPLIANCE”).
YOU FURTHER ACKNOWLEDGE AND AGREE THAT USERFEEDBACK DOES NOT WARRANTY, ASSURE AND/OR GUARANTEE THAT ITS SOFTWARE, CODING, AND/OR PHP PROGRAMMING LANGUAGE CAN BE MODIFIED TO MEET WCAG COMPLIANCE.
BY USING AND/OR DOWNLOADING USERFEEDBACK YOU EXPRESSLY ACCEPT USERFEEDBACK AS-IS AND AGREE TO BE FULLY RESPONSIBLE AND SOLELY LIABLE TO ENSURE THAT YOUR WEBSITE AND/OR YOUR INTENDED USE OF USERFEEDBACK MEETS WCAG COMPLIANCE AND ANY OTHER ACCESSIBILITY REGULATIONS, AS REQUIRED BY LAW, WHICH MAY CHANGE FROM TIME-TO-TIME. YOU FURTHER AGREE TO TEST USERFEEDBACK AND ALL OF ITS FUNCTIONALITY AND FEATURES ON YOUR WEBSITE LOCALLY PRIOR TO ALLOWING USERFEEDBACK TO BECOME LIVE TO THE PUBLIC IN ORDER TO ENSURE THAT YOU ARE ABLE TO MEET WCAG COMPLIANCE. FURTHER, IT IS YOUR RESPONSIBILITY TO REMAIN INFORMED ON ALL ISSUES AND REQUIREMENTS RELATING TO WCAG COMPLIANCE.
BY CHOOSING TO DOWNLOAD, INSTALL AND/OR OTHERWISE USE USERFEEDBACK ON YOUR WEBSITE, A THIRD-PARTY WEBSITE, AND/OR ANY OTHER ONLINE PLATFORM YOU HEREBY CLAIM THAT ANY SUCH WEBSITE(S) AND/OR ONLINE PLATFORM(S), INCLUDING ALL PAGES AND FEATURES HAVE BEEN TESTED BY YOU AND MEET WCAG COMPLIANCE. IN NO EVENT SHALL USERFEEDBACK (INCLUDING ANY OF ITS AUTHORIZED REPRESENTATIVES, PRINCIPALS, AGENTS, OFFICERS, DIRECTORS, SHAREHOLDERS, MEMBERS, PARTNERS, EMPLOYEES, ASSOCIATES, SUCCESSORS, ASSIGNS, SUBSIDIARIES, LICENSEES AND/OR OWNERS) BE LIABLE TO YOU OR TO ANY THIRD-PARTY CLAIMING THROUGH YOU OR ON YOUR BEHALF FOR ANY FAILURE TO MEET WCAG COMPLIANCE. YOU AGREE TO TAKE ALL RESPONSIBILITY RELATED TO MEETING WCAG COMPLIANCE.
IN THE EVENT THERE ARE ANY CONTRADICTIONS BETWEEN THE TERMS CONTAINED IN THIS WCAG DISCLAIMER AND ANY OTHER TERMS OF SERVICE ON THIS SITE, THEN THE TERMS HEREIN SHALL CONTROL AS TO AN INCONSISTENCIES.
Support
Support for plugins sold and distributed by MonsterInsights, LLC is only available for those who have an active, paid support license.
Support, updates and plugin downloads are granted for one year after the original purchase based on the license that you have purchased. After one year is completed, the purchaser must renew their license in order to continue receiving support, updates, and access to download plugin files for the items purchased.
Support for UserFeedback is provided as long as UserFeedback is actively in development. Should any one of the following occur, MonsterInsights, LLC will no longer be responsible for providing support for UserFeedback:
- UserFeedback is no longer actively developed as a viable product under MonsterInsights, LLC.
- UserFeedback or the parent company is purchased or bought out by another company.
- WordPress is no longer actively developed.
While we attempt to provide the best support possible for our plugins, we do not guarantee that any particular support query can or will be answered to the extent that the inquirer is completely satisfied.
License Holders
Only a license holder is permitted to request support or access support resources. If any attempt is made by another party other than the license holder to access support in a manner not specified, we reserve the right to suspend indefinitely the license key without notice or consent.
Re-posting content from any portion of this site, including support forum and documentation materials, is strictly prohibited. If any attempt is made to re-post content in a manner specified above, we reserve the right to suspend indefinitely the license key without notice or consent.
Sharing or Reselling your license key is not allowed. If we discover a violation of this rule, we reserve the right to immediately suspend the account without notice, indefinitely.
Inactive License
If your license becomes inactive and is otherwise no longer valid, (a) UserFeedback will no longer be obligated to provide you the Services, (b) your account will no longer be accessible by you to download plugin files, install or use addon files, or use licensed features (c) you will immediately stop using Services, and (c) all licenses and other rights granted to you under the Agreement will immediately cease. UserFeedback will not be liable to you or any third party for termination of this Agreement or any termination or suspension of your use of the Services.
YOU ACKNOWLEDGE THAT YOUR CONTENT MAY BE DELETED FROM YOUR ACCOUNT UPON YOUR LICENSE BECOMING INACTIVE. THIS CONTENT CANNOT BE RECOVERED ONCE DELETED. IF YOUR LICENSE IS NOT ACTIVE, USERFEEDBACK WILL NOT STORE CONTENT ON YOUR BEHALF.
Limitation of Liability / Exclusion of Consequential and Related Damages
NEITHER PARTY'S LIABILITY WITH RESPECT TO ANY SINGLE INCIDENT ARISING OUT OF OR RELATED TO THIS AGREEMENT WILL EXCEED THE AMOUNT PAID BY YOU HEREUNDER IN THE 12 MONTHS PRECEDING THE INCIDENT, PROVIDED THAT IN NO EVENT WILL EITHER PARTY’S AGGREGATE LIABILITY ARISING OUT OF OR RELATED TO THIS AGREEMENT EXCEED THE TOTAL AMOUNT PAID BY YOU HEREUNDER. THE ABOVE LIMITATIONS WILL APPLY WHETHER AN ACTION IS IN CONTRACT OR TORT AND REGARDLESS OF THE THEORY OF LIABILITY. HOWEVER, THE ABOVE LIMITATIONS WILL NOT LIMIT YOUR PAYMENT OBLIGATIONS UNDER THE “FEES” SECTION OF THE AGREEMENT.
IN NO EVENT WILL EITHER PARTY HAVE ANY LIABILITY TO THE OTHER PARTY FOR ANY LOST PROFITS, REVENUES OR INDIRECT, SPECIAL, INCIDENTAL, CONSEQUENTIAL, COVER OR PUNITIVE DAMAGES, WHETHER AN ACTION IS IN CONTRACT OR TORT AND REGARDLESS OF THE THEORY OF LIABILITY, EVEN IF A PARTY HAS BEEN ADVISED OF THE POSSIBILITY OF SUCH DAMAGES. THE FOREGOING DISCLAIMER WILL NOT APPLY TO THE EXTENT PROHIBITED BY LAW.
THE FOREGOING LIMITATIONS SHALL ALSO APPLY WITH RESPECT TO ANY DAMAGES INCURRED BY REASON OF ANY CONTENT OR SERVICES PROVIDED ON ANY THIRD PARTY SITES OR OTHERWISE PROVIDED BY ANY THIRD PARTIES OTHER THAN UserFeedback AND RECEIVED BY YOU THROUGH OR ADVERTISED ON THE SITE OR RECEIVED BY YOU ON ANY THIRD PARTY SITES. YOU ALSO AGREE THAT UserFeedback WILL NOT BE RESPONSIBLE OR LIABLE FOR ANY LOSS OR DAMAGE OF ANY KIND INCURRED AS THE RESULT OF ANY INTERACTIONS OR DEALINGS WITH ADVERTISERS OR AS THE RESULT OF THE PRESENCE OF SUCH ADVERTISERS ON THE SITE.
UserFeedback reserves the right to modify, suspend or discontinue the Site and/or Services, or any portion thereof, with or without notice at any time and for any reason, including, but not limited to, a failure to comply with the terms of this Agreement. UserFeedback shall have no liability whatsoever for any damages, liabilities, losses or any other consequences that you may incur as a result of any such modification, suspension or discontinuance.
Indemnity
You agree to indemnify, defend, and hold harmless UserFeedback, and its subsidiaries, affiliates, co-branders, all third-party advertisers, technology providers, service providers or other partners, and each of their respective officers, directors, agents, shareholders, employees and representatives, from and against any third party claim, demand, loss, damage, cost, or liability (including, reasonable attorneys' fees) arising out of or relating to this Agreement or the Site, including but not limited to in relation to: (a) your use, non-use or misuse of, or connection to the Site, the Services and any Content, including without limitation your Content and any third party Content, forming part of the Site; (b) your breach or alleged breach of this Agreement; and (c) your violation of any rights, including intellectual property rights, of a third party. UserFeedback reserves the right, at your expense, to assume the exclusive defense and control of any matter for which you are required to indemnify UserFeedback and you agree to cooperate with UserFeedback's defense of these claims. You agree not to settle any matter without the prior written consent of UserFeedback. UserFeedback will use reasonable efforts to notify you of any such claim, action or proceeding upon becoming aware of it.
Cancellation and Termination
If you wish to cancel your Subscription, you can do so by logging into your account and proceeding with this option through the billing section menu. If you are unable to find this option within the billing section or if you have questions or need assistance, please contact Support and they can assist you with the cancellation process. You will remain liable for all charges accrued on your account up to the time that you downgrade or cancel your Subscription, including full monthly fees for the month in which you cancelled, provided however that if you cancel your Subscription within the first fourteen (14) days of opening your UserFeedback Account, you will receive a refund of your Subscription fee.
Upon cancellation of your Subscription, UserFeedback is under no obligation to maintain or store your account information or Content. UserFeedback may, at its option, either delete your information and Content immediately or retain it (in full or in part) in accordance with UserFeedback’s processes and practices.
UserFeedback reserves the right at any time, and without cost, charge or liability, to terminate this Agreement at its sole discretion for any reason, including, but not limited to, a failure to comply with the terms of this Agreement. In addition, UserFeedback may, in its sole discretion, at any time, temporarily or permanently suspend access to your account, Subscription or Services for any violation or suspected violation of this Agreement. UserFeedback also reserves the right to deny access to anyone, including, but not limited to those users who use proxy servers and/or IP addresses residing in certain geographical areas outside of Canada and the United States. UserFeedback reserves the right to terminate any portion of the Site at any time, for any reason, with or without notice.
Automatic Renewal
Unless you notify MonsterInsights, LLC before the end of the applicable subscription period that you want to cancel your renewal, your subscription will automatically renew and you authorize us to collect the then-applicable annual or monthly subscription for such Renewal using any credit card or other payment medium we have on record for you. A subscription can be cancelled at any time in the My Account and Billing section of your dashboard.
Refund Policy
The UserFeedback no-risk money back guarantee offers that, if at any time within the first 14 days of opening your paid Account you decide that UserFeedback is not for you, then just let our awesome support team know (we make it easy!).
We will stop your Subscription and issue you a refund. Your request for a cancellation must be received within 24 business hours of the 14 days of the date and time of opening your paid Account. While some refunds may be instant, refund credit can take up to 5 - 10 business days to show up in your credit card statement.
If adequate notice is not received and your credit card is subsequently charged, you will not receive a refund.
Free trial accounts and renewals are not eligible for refunds.
Discount Policy
On occasion, UserFeedback may offer purchase incentives in the form of subscription discount codes. Discount codes are applied on an introductory basis, meaning that are only applied for the first term of the subscription selected. Discount codes do not perpetuate with the life of the subscription. After your initial term has passed, subscriptions will be charged the regular price.
Agreement to Governing Law and Jurisdiction
If there is any dispute between you and UserFeedback about or involving this Agreement, the Site or the Services, you hereby agree that the dispute shall be governed by and construed in accordance with the laws of the state of Florida, without regard to its conflict of law provisions. You hereby agree to submit to the exclusive jurisdiction of the courts in West Palm Beach, Palm Beach County, Florida, with respect to any claim, proceeding or action relating to or otherwise arising out of this Agreement, the Site or the Services, howsoever arising, provided always that UserFeedback may seek and obtain injunctive relief in any jurisdiction.
Severability
If any portion of this Agreement is deemed unlawful, void or unenforceable by any arbitrator or court of competent jurisdiction, this Agreement as a whole shall not be deemed unlawful, void or unenforceable, but only that portion of this Agreement that is unlawful, void or unenforceable shall be stricken from this Agreement.
Legal Remedies
You agree that this Agreement is specifically enforceable by injunctive relief and other equitable remedies without proof of monetary damages.
You agree that if UserFeedback does not exercise or enforce any legal right or remedy which is contained in the Agreement (or which UserFeedback has the benefit of under any applicable law), this will not be taken to be a formal waiver of UserFeedback’s rights and that those rights or remedies will still be available to UserFeedback.
Surviving Provisions
The sections of “Submission of Content”, “Intellectual Property Rights”, “Confidential Information”, “Disclaimer of Warranties”, “Third Party Sites and Content”, “Limitation of Liability/Exclusion of Consequential and Related Damages”, “Indemnity” and “Agreement to Governing Law and Jurisdiction”, “Severability”, “Legal Remedies”, and any other provisions that by their nature are intended to survive will survive any actual or purported termination of your account or termination or expiration of this Agreement and shall continue in full force and effect.
Manner of Giving Notice
Except as otherwise specified in this Agreement, all notices, permissions and approvals hereunder shall be in writing and shall be deemed to have been given upon: (i) personal delivery, (ii) the second business day after mailing, (iii) the second business day after sending by confirmed facsimile, or (iv) the first business day after sending by email. Billing-related notices to you shall be addressed to the relevant billing contact designated by you. All other notices to you shall be addressed to the relevant contact designated by you.
Miscellaneous
NPS is a registered trademark, and Net Promoter Score and Net Promoter System are service marks, of Bain & Company, Inc., Satmetrix Systems, Inc. and Fred Reichheld.
For any questions, feel free to reach out at 561-408-1057

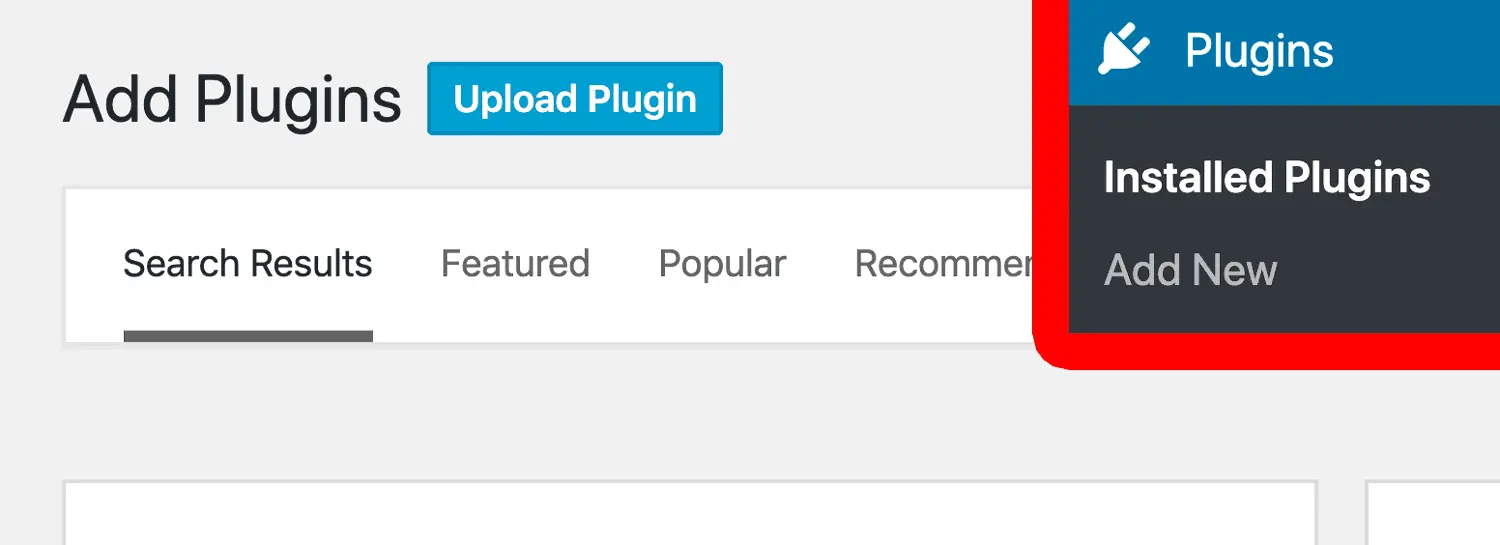 On the new page, you can click the Choose File button to navigate to the folder you downloaded the zip file containing UserFeedback and select it.
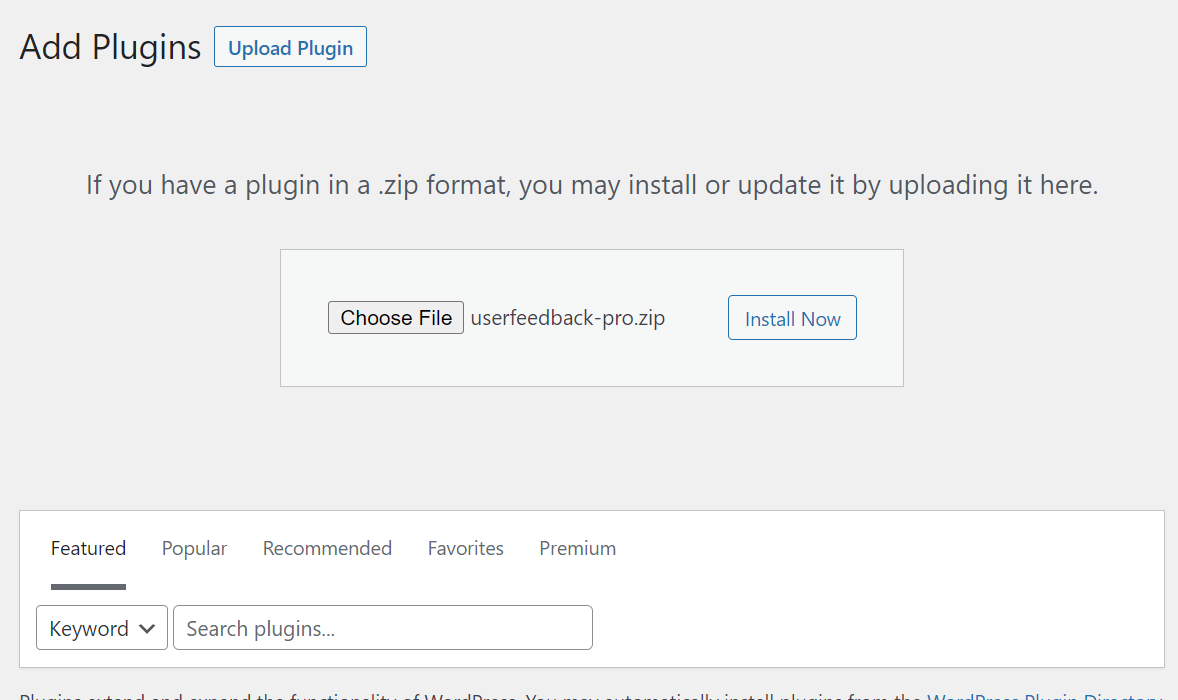 Once the UserFeedback zip file has been uploaded and installed, you can click the blue Activate Plugin button to activate the plugin on your site.
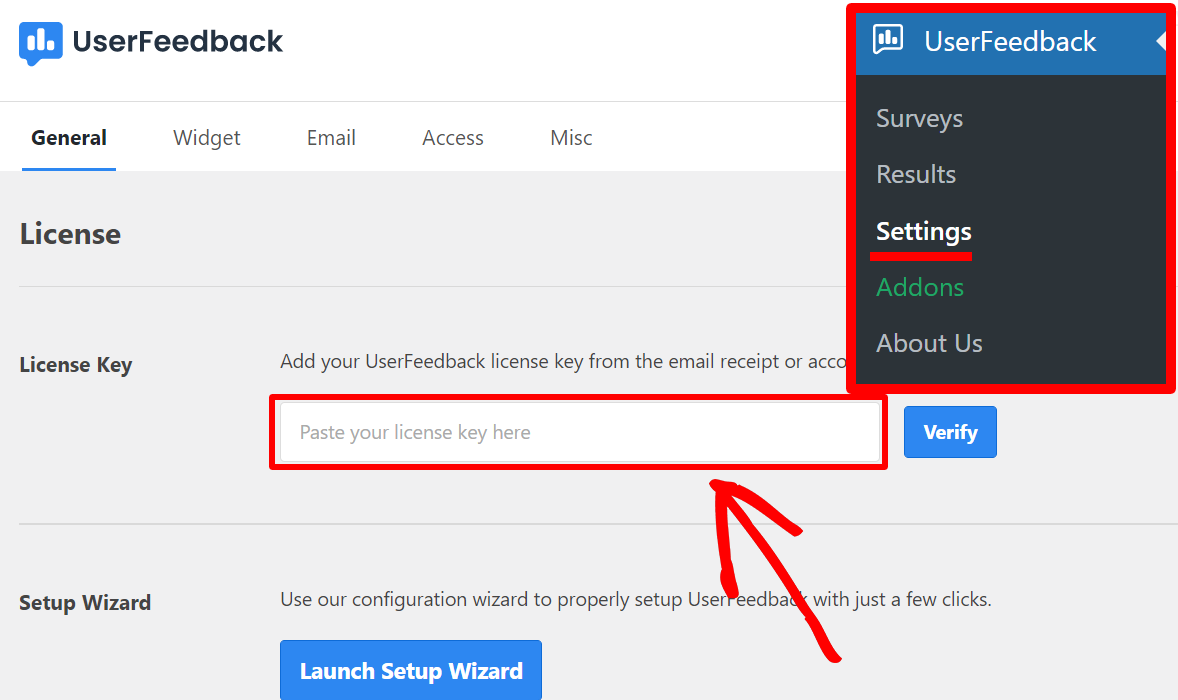
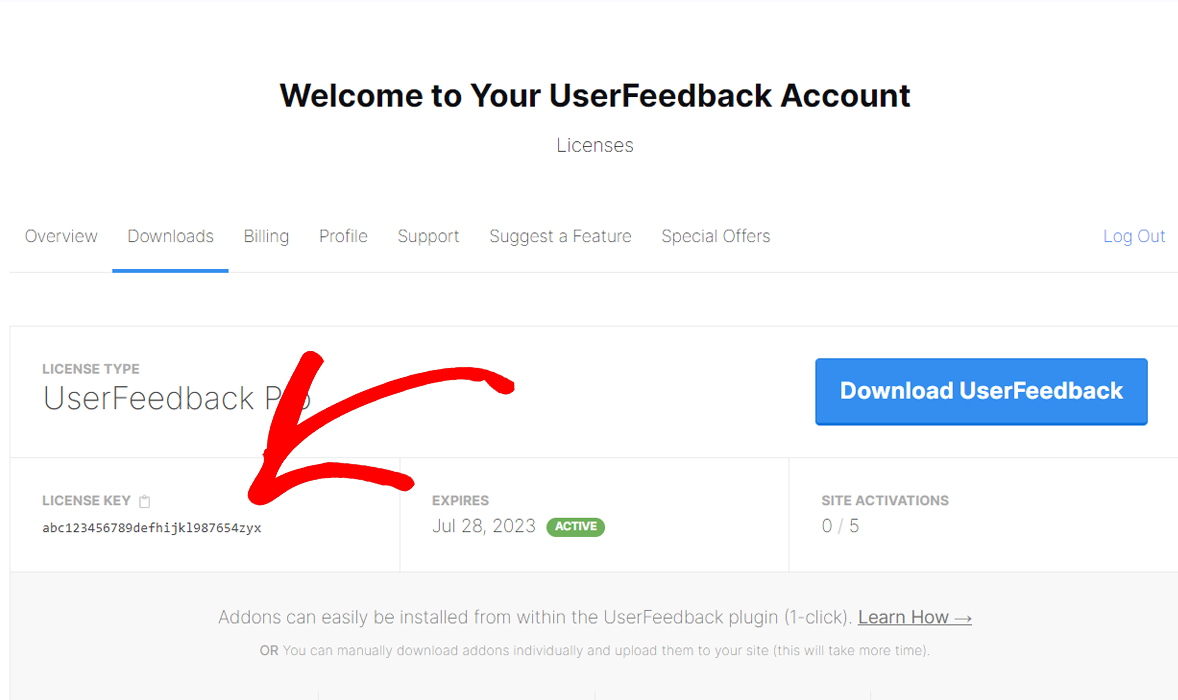 Back in your WordPress admin area, you can navigate to UserFeedback » Settings to enter your license and then click on the Verify button.